Are your food photos flat and uninviting? Despite your delicious dishes, your pictures look clinical and bland, failing to capture the warm, cozy atmosphere you want to create on screen.
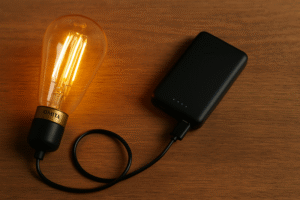
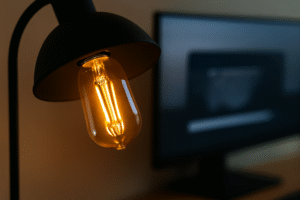
Use dimmable LED Edison bulbs for side or backlighting. Their signature warm glow adds rich color, creates dramatic shadows that reveal texture, and gives your food a rustic, artisanal mood impossible with standard lights.

I was speaking with a client in the United States who distributes lighting to a large chain of farm-to-table restaurants. He told me their marketing teams have completely switched to using our amber LED filament bulbs for their social media photography. They found it's the fastest way to get a consistent, high-end "comfort food" look. Instead of complicated setups, they just use one or two of our bulbs, an ST64 model, to create that signature warm, inviting glow. It's a simple trick, but it makes their food look irresistible, and it's something any food blogger, chef, or photographer can replicate.
Why Choose Edison Bulbs Over Natural Light or Flash?
Is unpredictable natural light ruining your shoots? Or does your camera flash make food look greasy and artificial? You're constantly fighting your lighting to get a professional, appetizing shot.
Edison bulbs provide consistent, controllable warm light. Unlike fleeting daylight, you can shoot anytime. Unlike harsh flash, they create soft, flattering highlights that enhance texture and make food look delicious.

Food photographers typically chase the "golden hour" of natural light for its soft, warm qualities. The problem? It's unreliable and lasts for a very short time. The alternative, an on-camera flash, is often worse, creating harsh specular highlights that make food look oily and flat. LED Edison bulbs offer the best of both worlds: the beautiful warm quality of golden hour light, but with the consistency and control of a studio setup. As a manufacturer, we've focused on perfecting the 2200K color temperature in our Omita bulbs specifically to replicate this desirable warm light, giving photographers a reliable tool to create mood on demand.
Total Control vs. Natural Light
You can't schedule creativity around the weather. Relying on natural light means your shooting schedule is dictated by the sun and clouds. With LED Edison bulbs, your "golden hour" is available 24/7. This consistency is crucial for creating a cohesive look for a cookbook, a restaurant menu, or an Instagram feed.
Quality of Light1 vs. Flash
The table below breaks down the key differences. The main takeaway is that an Edison bulb's light wraps around food, whereas a flash hits it. This creates a more pleasing result that feels professional and intentional.
| Light Source | Quality of Light1 | Mood & Texture | Control |
|---|---|---|---|
| Natural Light | Soft, beautiful | Warm, natural | Unpredictable |
| Camera Flash | Hard, harsh | Clinical, flat | High control, poor quality |
| LED Edison Bulb2 | Soft, continuous | Warm, moody, textured | Total control, high quality |
How Should You Position Edison Bulbs for Mouth-Watering Food Shots?
Are you using warm bulbs but your food still looks flat and boring? Placing the light directly in front of your dish is killing all the interesting textures and making the photo one-dimensional.
Always use side or backlighting. Side lighting from the left or right reveals texture and creates gentle shadows. Backlighting creates a dramatic glowing rim around the food, making it look fresh and irresistible.

In food photography, light is what creates appetite appeal. Frontal lighting, where the light source is near the camera, is the number one mistake beginners make. It flattens the image and eliminates the small shadows that define texture. To make food look delicious, you need to create dimension. This is achieved by moving your light to the side or even behind your subject. This technique, called chiaroscuro, uses light and shadow to sculpt your subject. It's the secret to making a simple slice of bread look crusty and artisanal or making a drink look refreshing and cool.
The Power of Side Lighting
Place your Edison bulb in its fixture to the side of your food setup, at about a 90-degree angle from your camera. This light will rake across the surface of the food, highlighting every bump, crumb, and detail. This is perfect for showcasing the texture of fried chicken, a flaky pastry, or a rustic loaf of bread.
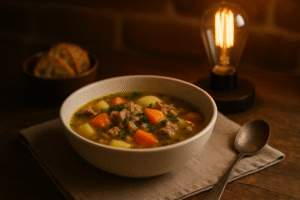
Creating Drama with Backlighting3
Position your light source4 behind the dish, pointing partially towards the camera. This is a magical technique for certain foods. It will make steam rising from a hot soup visible and dramatic. It makes drinks, like a glass of beer or a cocktail, glow from within. It creates a beautiful shining "rim" of light around the edges of your food, which helps it pop from the background. For both side and backlighting, use a simple piece of white cardboard on the opposite side to bounce a little light back and soften the shadows.
What Camera Settings Are Essential for Shooting With Edison Bulbs?
Are your food photos coming out dark, blurry, or full of digital noise? You've set up the perfect lighting, but your camera's automatic settings can't handle the moody, low-light scene correctly.
Shoot in Manual Mode on a tripod. Use a wide aperture (f/2.8-f/5.6), a slow shutter speed (e.g., 1/15s), and a low ISO (100-400). Crucially, set your white balance manually to 3000K-4000K.

An LED Edison bulb doesn't produce the same high volume of light as the sun or a studio strobe. To get a bright, sharp, and clean image, you must take your camera off "Auto" and give it the correct instructions. Using a tripod is the first, non-negotiable step. It will keep your camera perfectly still, allowing you to use a slow shutter speed to soak up all that beautiful, warm light without any risk of blur. Mastering these manual settings is the key technical skill that separates amateur phone snaps from professional food photography.
The Exposure Triangle for Food
Your aperture (f-stop) controls how much of the dish is in focus. An f-stop of f/4.0 or f/5.6 is great for keeping most of the plate sharp. Your shutter speed can be slow since the food isn't moving; something like 1/15th or 1/30th of a second is a good start. Keep your ISO as low as possible (ISO 100-400) to ensure the image is clean and noise-free.
Why Manual White Balance is Everything
If you let your camera decide the color, it will see the warm 2200K light from the Edison bulb and try to "fix" it by making it neutral white. This completely destroys the mood. You must set your white balance manually5 to preserve the warmth.
| White Balance Setting | Result |
|---|---|
| Auto | The camera neutralizes the warmth, making the scene look clinical. |
| Tungsten Preset | Better, but can sometimes over-correct and look too blue/cool. |
| Manual (Kelvin)6 | The best option. Set it between 3000K and 4000K to perfectly capture the intended golden glow. |
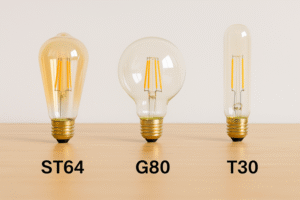
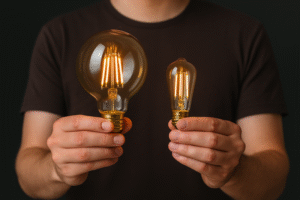
Which Bulb and Fixture Best Complements Your Food Style?
Does the bulb in your shot look awkward or out of place? You've perfected the lighting, but the bulb itself doesn't match the story of your dish, creating a visual disconnect for the viewer.
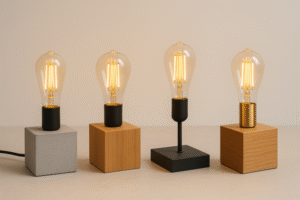
Match the bulb to the mood. Use classic ST64 amber bulbs for rustic scenes like stews or bread. Use sleeker T30 tubular bulbs for modern dishes. A simple hanging cord or wooden base fixture works best.

When the Edison bulb is visible in your photo, it stops being just a light source and becomes a prop. Its shape, size, and glass color are now part of your composition and storytelling. The choice of bulb should be as intentional as your choice of plate or napkin. This is why we at Omita manufacture such a wide variety of filament bulb styles; we know that our clients' customers are using them for specific design aesthetics. You should choose a bulb that reinforces the story you are trying to tell with your food.
For Rustic and Hearty Food
For dishes like soups, stews, roasted meats, or artisanal bread, the classic ST64 Teardrop or G95 Globe bulb with amber glass is the perfect choice. This combination screams "farmhouse kitchen" or "cozy bistro." Pair these bulbs with natural textures like wood cutting boards, cast iron pans, and linen napkins.
For Modern and Minimalist Dishes
For sleek desserts, creative cocktails, or minimalist plating, a more modern bulb shape works better. The long, clean lines of a T30 Tubular bulb or the perfect sphere of a clear glass G95 Globe complements a contemporary aesthetic. These look fantastic paired with slate boards, marble surfaces, and simple ceramic dinnerware. In all cases, a minimalist fixture like a simple hanging fabric cord or a small wooden or concrete block base keeps the focus on the food and the beautiful bulb.
Conclusion
LED Edison bulbs are a secret weapon for stunning food photography. They give you complete creative control over mood, texture, and story, helping you turn simple dishes into mouth-watering works of art.
-
Understanding the quality of light is crucial for achieving professional-looking photos. Explore this link to enhance your photography skills. ↩ ↩
-
LED Edison Bulbs provide soft, continuous light that enhances mood and texture in photos. Discover more about their advantages here. ↩
-
Understanding backlighting can elevate your food photography skills, making your dishes look more appealing and vibrant. ↩
-
Choosing the right light source is crucial for capturing stunning food images; explore this link to learn more about effective lighting techniques. ↩
-
Learning to set white balance manually can significantly improve your photos by preserving the intended warmth and ambiance. ↩
-
Understanding Manual (Kelvin) white balance can enhance your photography skills, allowing you to capture the perfect mood and color. ↩