Thinking about upgrading to stylish LED Edison bulbs but feel a bit unsure about installing them yourself? Don't let a little uncertainty stop you from transforming your space! It's actually quite easy.
Installing LED Edison bulbs is usually as simple as turning off the power, unscrewing the old bulb, and screwing in the new one. Always make sure the fixture is compatible and prioritize safety.

I remember when I first started looking into changing light fixtures and bulbs in my own home. It seemed a bit daunting! But as I learned more, especially working here at Omitaled where we focus on high-quality and user-friendly products, I realized that changing a bulb, even a fancy-looking LED Edison one, is a basic task most people can handle. This guide will walk you through it, step by step, so you can enjoy your new lights with confidence. Let's get started and light up your world!
What Do You Need to Do Before You Start Installing Your LED Edison Bulb?
Worried you’ll get halfway through and realize you're missing something or bought the wrong bulb? A little prep work now saves a lot of trouble later. Proper planning ensures a smooth installation.
Before installing, gather your new LED Edison bulb, a stable ladder if needed, and ensure the light fixture's power is off. Double-check the bulb's base type and wattage compatibility.

As an old saying goes, "measure twice, cut once." The same idea applies to any DIY project, including something as simple as changing a light bulb. I always tell my customers, like Jacky who values good quality and reliability, that taking a few minutes to prepare can make all the difference.
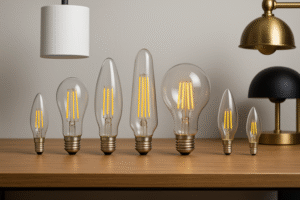
First, get your new LED Edison bulb1. Make sure it's the right one for your fixture. Most LED Edison bulbs, like many of the ones we manufacture at Omitaled, use a standard base like E26 (in North America) or E27 (common in Europe and other regions). Check your existing bulb or fixture to confirm the base type. Also, look at the wattage rating on the fixture2. LED bulbs use much less wattage for the same brightness (lumens) as old incandescent bulbs, which is great for saving energy. However, you still shouldn't exceed the fixture's maximum incandescent equivalent wattage if it's an older fixture, just to be safe with heat (though LEDs produce much less heat). For example, if your fixture says "Max 60W," an LED Edison bulb that gives the light of a 60W incandescent but only uses 8W is perfectly fine.
Second, check your tools. For a simple bulb change, you probably won't need much. If the fixture is high up, ensure you have a sturdy ladder or step stool. Make sure it’s placed on a flat, stable surface.
Third, and most importantly for later, know where your circuit breaker or fuse box3 is. You'll need this to turn off the power.
Here's a quick checklist:
| Preparation Step | Why It's Important | Omitaled Relevance |
|---|---|---|
| Choose the Right Bulb | Ensures compatibility (base, size, wattage) and safety. | We offer various E26/E27 base LED Edison bulbs. |
| Check Fixture Wattage Limit | Prevents overloading the fixture, even with low-watt LEDs. | Our LEDs are energy-efficient, reducing this risk. |
| Gather Necessary Tools (e.g., Ladder) | For safety and ease of access. | User safety is always a priority. |
| Locate Circuit Breaker/Fuse Box | Essential for safely turning off electricity. | Promotes safe installation of our products. |
Taking these simple steps means you're ready for a safe and successful installation. It's all part of ensuring you get the best from high-quality products.
How Can You Ensure Your Safety When Installing LED Edison Bulbs?
Nervous about working with anything electrical, even just changing a bulb? The thought of an electric shock can be scary, but following basic safety rules makes it perfectly safe.
Always turn off the power to the light fixture at the circuit breaker or fuse box before attempting to install or change any light bulb. This is the most critical safety step.

At Omitaled, our mission is to produce high-quality products, and an important part of that is ensuring they can be used safely. When Jacky, my typical customer, sources products, reliability includes safe handling and installation. Electrical safety is no joke, but it's also not complicated for a task like changing a bulb.
Here's what you MUST do:
- Turn Off the Power: Go to your home's circuit breaker panel4 or fuse box. Find the breaker or fuse that controls the light fixture you'll be working on. Flip the breaker to the "OFF" position or remove the fuse. If you're not sure which breaker it is, you can turn off the main power switch, but this will cut electricity to your whole house. It's better to identify the specific circuit if possible.
- Test the Switch: Try turning the light switch for the fixture on and off. The light should not come on. This is a good first check.
- Consider a Voltage Tester (Optional but Recommended): For extra certainty, especially if you're new to this, you can use a non-contact voltage tester5 to ensure there's no power at the fixture. These are inexpensive tools available at hardware stores.
- Keep Hands Dry: Make sure your hands are completely dry before touching any part of the light fixture or bulb.
- Use a Stable Ladder: If you need a ladder, ensure it is stable and on even ground. Have someone hold it if you’re unsure. Don’t overreach; move the ladder if needed.
My personal story? The first time I changed a bulb in a high ceiling fixture, I was more worried about the ladder than the electricity! But I double-checked the power was off, took my time, and it was fine. That feeling of accomplishment, knowing I did it safely, was great.
| Safety Precaution | Reason | Our Commitment at Omitaled |
|---|---|---|
| Turn Power Off at Breaker | Prevents electric shock – absolutely essential. | We want customers to use our products safely. |
| Test Light Switch | Confirms the intended circuit is off. | Encouraging good safety practices. |
| Use Voltage Tester (Optional) | Provides an extra layer of safety confirmation. | Supports confident DIY. |
| Dry Hands | Water conducts electricity, increasing shock risk. | Basic electrical safety. |
| Stable Ladder/Support | Prevents falls and injuries. | Holistic approach to user safety. |
Remember, safety isn't about being overly cautious; it's about being smart and respecting electricity.
What Are the Steps to Actually Change the LED Edison Bulb?
Ready to do the swap but not quite sure of the exact motions? Worried about breaking the old bulb or not getting the new one in right? It's a straightforward process.
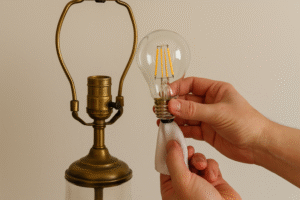
Once the power is off, carefully unscrew the old bulb by turning it counter-clockwise. Then, gently screw in the new LED Edison bulb clockwise until it's snug, but not overly tight.

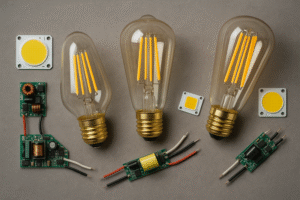
This is the part where you actually get to see the change happen! As someone who has seen many Omitaled LED filament bulbs6, like our popular ST64 or G95 styles, go into fixtures, I can tell you it's usually very satisfying. Let’s break it down:
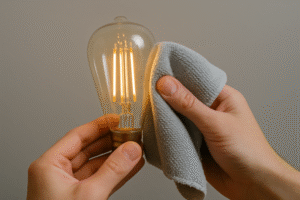
- Ensure the Old Bulb is Cool: If the light was just on, the old bulb might be hot, especially if it was an incandescent. Wait a few minutes for it to cool down before trying to remove it. LED bulbs generate much less heat, so this is less of an issue with them, but it's a good habit.
- Remove the Old Bulb: Gently grasp the old bulb and turn it counter-clockwise (to the left – think "lefty-loosey"). It should unscrew easily. If it feels stuck, don't force it too hard, as old bulbs can sometimes be brittle. A little wiggle might help. Once it's loose, carefully remove it from the socket.
- Inspect the Socket (Optional): Take a quick look at the socket. Does it look clean and free of corrosion or damage? If it looks very old or damaged, you might need an electrician to replace the fixture itself. This isn't usually a problem.
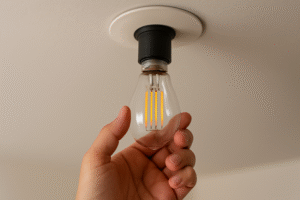
- Install the New LED Edison Bulb: Take your new LED Edison bulb7. Align its base with the socket. Gently turn it clockwise (to the right – "righty-tighty") until it feels snug. You don't need to overtighten it. Just make sure it's making good contact. Our Omitaled bulbs are designed for easy fitting into standard E26/E27 sockets.
- Consider Dimmer Compatibility (If Applicable): If your fixture is connected to a dimmer switch, make sure your new LED Edison bulb is "dimmable." Not all LED bulbs are. If you use a non-dimmable LED with a dimmer, it might flicker, buzz, or not work correctly. Many of our LED Edison bulbs are dimmable, offering that extra flexibility.
And that's pretty much it for the physical installation! No complicated wiring, no special tools required for a simple bulb swap.
| Installation Step | Detail / Tip | Why It's Important for LED Edison Bulbs |
|---|---|---|
| Cool Down Old Bulb | Prevents burns (less of an issue with prior LEDs). | Safety first. |
| Unscrew Old Bulb | Counter-clockwise, gentle but firm. | Standard removal procedure. |
| Screw In New LED Bulb | Clockwise, snug fit, don't overtighten. | Ensures good electrical contact. |
| Check Dimmer Comp. | Use dimmable LEDs with dimmer switches. | Prevents performance issues like flickering. |
With the new bulb in place, you're almost ready to enjoy the new ambiance.
What Should You Do After Installing the Bulb and What If It Doesn't Work?
Swapped the bulb, but now you're holding your breath – will it light up? And what if it doesn't? Don't panic; there are a few simple checks you can do.
After installation, turn the power back on at the breaker and test the light switch. If the bulb doesn't work, re-check the power, ensure the bulb is screwed in securely, or try it in another fixture.

This is the moment of truth! I always feel a little sense of satisfaction when I flip that switch and the new light comes on, perfectly illuminating the space. It’s a small win, but it’s a good feeling. Here's the final part of the process:
- Restore Power: Go back to your circuit breaker or fuse box and flip the breaker back to the "ON" position (or reinsert the fuse).
- Test the Light: Now, go to the light switch for the fixture and turn it on. Your new LED Edison bulb should illuminate! Enjoy the warm, stylish glow.
But what if it doesn't light up? Don't worry, this happens sometimes. Here are a few troubleshooting steps my client Jacky, who values reliable products, would appreciate:
- Check the Power Again: Is the breaker definitely on? Did you flip the correct one? Sometimes, it's the simplest thing.
- Ensure the Bulb is Secure: Turn the power off again at the breaker. Then, make sure the bulb is screwed in all the way (snug, not forced). Sometimes it might not be making full contact.
- Try the Bulb in Another Fixture: To rule out a faulty bulb (rare with quality Omitaled products, but always a possibility with any electronics), try an LED bulb you know works in the problematic fixture, or try the new bulb in a fixture you know is working. This helps identify if the issue is the bulb or the fixture.
- Check the Fixture's Tab: (Advanced – do this with POWER OFF ONLY). Sometimes, the little metal tab at the very bottom of the socket can get pushed down too far and not make contact with the bulb. Very carefully, you could try to gently pry it up a tiny bit with a non-metallic tool. If you are not comfortable doing this, skip it.
- Is the Fixture Itself Faulty? If you've tried everything and other bulbs also don't work in that fixture, there might be an issue with the fixture wiring or the switch. At this point, if you're not experienced with electrical work, it's best to call a qualified electrician.
Our goal at Omitaled is to provide reliable, high-quality lighting. If you ever suspect an issue with one of our bulbs after ruling out these common installation steps, our customer service would be there to assist.
| Troubleshooting Step | Action | Rationale |
|---|---|---|
| Check Power Breaker | Ensure the circuit is actually on. | A common oversight. |
| Check Bulb Seating | Ensure bulb is screwed in fully (power off first!). | For proper electrical contact. |
| Test Bulb Elsewhere | Determines if the bulb or the fixture is the issue. | Isolates the problem. |
| Call Electrician (If Needed) | For fixture/wiring issues beyond a simple bulb change. | Safety and expertise for complex problems. |
Usually, it's a simple fix, and you'll have your beautiful LED Edison lighting working in no time!
Conclusion
Installing LED Edison bulbs is a simple, beginner-friendly DIY task. By following these safety and installation steps, you can easily upgrade your lighting and enjoy their unique charm and efficiency.
-
Explore the advantages of LED Edison bulbs, including energy efficiency and longevity, to make an informed choice for your lighting needs. ↩
-
Understanding wattage ratings is crucial for safe bulb replacements; this resource will guide you through the process effectively. ↩
-
Knowing the location of your circuit breaker is essential for safety during electrical work; this link will help you find it easily. ↩
-
Learn about safely locating and using a circuit breaker panel to ensure your electrical work is done safely. ↩
-
Explore this link to understand how a non-contact voltage tester can enhance your safety during electrical work. ↩
-
Discover why Omitaled LED filament bulbs are favored for their design and functionality, enhancing your lighting experience. ↩
-
Explore the advantages of LED Edison bulbs, including energy efficiency and aesthetic appeal, to enhance your lighting choices. ↩